

By Genevieve
With St. Patrick's Day coming up in less than two weeks, I wanted to experiment with a recipe to celebrate the occasion. It seems like pretty much every traditional Irish recipe from soda bread to colcannon has already been posted several times, and I've seen tons of different green tinted foods and beer infused foods on the web too. So instead of going with something green, alcoholic, or Irish, I looked for inspiration from another St. Patrick's Day icon: the pot o'gold at the end of a rainbow!
My mind immediately started spinning with ideas for how to create a rainbow themed recipe, and in the end, I came up with this layered cake made with a raw crust, four layers of "ice cream" made solely from fruit, and a coconut whipped cream topping to resemble a cloud. And of course, the final touch that I added just for photo purposes was a pile of gold coins (chocolate, not real gold unfortunately)!
I was so happy with how this cake turned out - it was just how I had pictured it in my mind. And since I loved how it looked so much, this post is going to be more picture-heavy than usual!
While the recipe may look long and it was a bit time consuming to make, there wasn't that much actual hands-on time and as long as you've got some ripe fruit and a food processor, you can easily make this yourself!
The crust is a simple mixture of raw nuts, dates and coconut that gets crushed up and pressed down into the bottom of your cake pan.
Once the crust is ready, the next step is making the layers for the cake one at a time. The base of each layer is a frozen banana, which as many of you probably already know, turns into a creamy ice cream-like consistency when you blend it in a food processor (although it firms up quite a bit after being in the freezer).
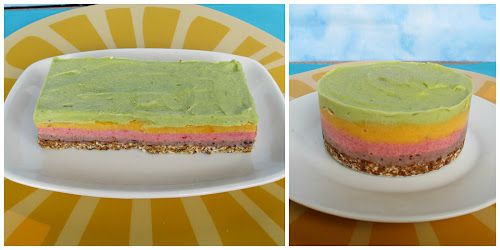
By adding different coloured fruits along with the banana, I was able to make four distinct layers to represent (some of) the colours of the rainbow: purple from blueberries and blackberries; pink from strawberries; yellow from mango; and green from avocado.
I actually made enough for two small cakes, in different shapes. Pictured above is a round cake made with a miniature springform cake pan (which makes removal much easier!), and below is a rectangular cake made by forming the layers in one side of a square cake pan.
I liked the look of both shapes, so feel free to use whichever size pan is more convenient. As long the pan has edges to hold in the layers, you can build your cake in pretty much any shape you like!
While you could eat the ice cream cake on its own, I highly recommend making the coconut whipped cream topping. If you've never made whipped cream from coconut milk before, you can find step-by-step guides at the Kitchn and Oh She Glows to use as references.
I sweetened the whipped cream with a bit of icing sugar and added a dash of coconut extract to bring out the coconut flavour even more. I loved how light and fluffy the whipped cream was and it tasted so good with the fruity ice cream layers.
If you love rainbow sherbert, then you'll love this cake because that's pretty much what it tastes like when you take a bite of all the layers together. And if you're worried about the avocado, don't be - it actually blends well with the other flavours and you don't really notice a pronounced avocado taste when you eat everything together.
And can you believe that there's no added sugar or sweetener of any kind in the whole cake (not including the whipped cream)? As long as you have ripe fruits, they should provide all the natural sweetness you need!
I doubt my cakes will last until St. Patrick's Day, but you don't need a holiday to make this - I think it would brighten up any day :).
Raw Rainbow "Ice Cream" Cake with Coconut Whipped Cream
Note: This recipe does require some preparation at least a day in advance. Before you start making it, make sure you have at least 3 ripe bananas in your freezer and a can of coconut milk chilling in the fridge.
Ingredients:
Crust
- 1/4 cup natural almonds
- 1/4 cup raw cashews
- 2 tbsp unsweetened shredded coconut
- 1 tbsp ground flax
- Dash of salt
- 1/2 cup (heaping) chopped dates
Purple Layer
- 1 small-medium frozen ripe banana, chopped
- 1/4 cup blueberries and blackberries
Pink Layer
- 1 small-medium frozen ripe banana, chopped
- 1/4 cup chopped strawberries
Yellow Layer
- 1/2 a large frozen ripe banana, chopped
- 1/2 heaping cup chopped ripe mango
Green Layer
- 1/2 a large frozen ripe banana, chopped
- 1/2 a ripe avocado (about ½ cup)
- 1/2 tsp lime zest
Topping
- 1 can full fat coconut milk, chilled in the fridge overnight unopened
- 1 tbsp icing sugar
- 1/2 tsp coconut extract (can substitute vanilla extract if desired)
Instructions:
To make the crust, place the almonds and cashews in the small bowl of a food processor and process until the nuts are ground. Add the coconut, flax, and salt and process again until ingredients are combined. Add the dates and process until the dates are broken down. The mixture should stick together if you squeeze it together with your fingers.
Transfer the crust to the bottom of your desired pans. I filled one round mini cake pan (4-inch wide, 2-inch deep pan with a removable bottom) and used the remaining crust to make a rectangular shaped cake by filling an 8x8 square pan (lined with a piece of parchment paper) about one-third to one-half full. Press the crust mixture down firmly, making sure it is evenly spread. Store the crust in the fridge or freezer while you make the remaining layers.
Make the ice cream layers one a time, in whichever order you like. For each layer, place the ingredients in the small bowl of your food processor and process until smooth, scraping down the sides of the bowl with a spatula if necessary. Once you’ve made one layer, spread it evenly over the crust in your pan(s). Let it sit in the freezer until it starts to firm up, at least 15-30 minutes.
Continue with the next ice cream layer, following the same process as before. Let each layer firm up in the freezer before adding the next one.
Here's how the cakes looked before frosting:
To make the whipped cream, open your can of coconut milk (do not shake it first). Scoop out the thick white cream that should have formed on top into a bowl (leave the watery part in the can). Use a hand mixer (or stand mixer) to beat the cream until it starts to firm up. Add the icing sugar and coconut extract and continue beating until the cream is nice and thick and fluffy like whipped cream, about 3-5 minutes.
Keep ice cream cake(s) stored in the freezer. For the best defrosting results, transfer cake to the fridge for about 1 hour prior to serving, then let sit at room temperature for 5-10 minutes, until the ice cream starts to soften slightly. Top cake(s) with whipped cream (Note: If you are storing the cake in the freezer, I would recommend keeping the whipped cream separate in the fridge, and adding it to individual servings when you're ready to eat, otherwise it will become a frozen block of whipped cream, as I learned!).
Makes 2 small cakes or 1 larger cake.


0 Comments:
Post a Comment